Earlier this summer, Arcol launched its collaborative, browser-based building design platform, promising to transform the way architects, engineers and construction (AEC) teams design and build. On its blog page, Arcol describes its platform as “introducing powerful real-time collaboration, intuitive modeling and seamless data integration in one easy-to-use, web-based environment that reignites creativity and streamlines the building design process by replacing disconnected tools, clunky exports and the version chaos that slows teams down.” Being a 30-plus-year traditional CAD software user, I am always intrigued by modern CAD software, particularly cloud-based. So, I wanted to take a closer look and give Arcol a try for myself to see firsthand what Paul O’Carroll, Arcol’s founder and CEO, who stated, “We built Arcol to bring the magic back to building design,” was all about.

The Arcol pricing page included three plans. Users have two options for a Team plan: a monthly plan at $100 per user and an annual plan that includes a dedicated customer success manager, personalized onboarding and early access to new features. There is also a basic plan for solo users using Arcol for personal projects. The basic plan is free and includes unlimited collaborators, live updating metrics, advanced 3D modeling tools, the ability to create sheets and automatic site context.
After clicking on the Get Started link, I entered some basic information. From there, it took less than 5 minutes for the Arcol browser to open and be ready to use. The welcome screen prompted me to select a role and my company size. Next, I had the option to join a team or create a new one. I was then invited to a 14-day trial and prompted to get started with an interactive tutorial titled Basic Modeling.
After the 14-day trial, users can continue with a free license by downgrading to a plan that includes three personal projects and 24-hour version history, but no teams. Alternatively, you can upgrade to a paid plan with unlimited team projects, version history, templates and export for $100 per month.
Projects Page
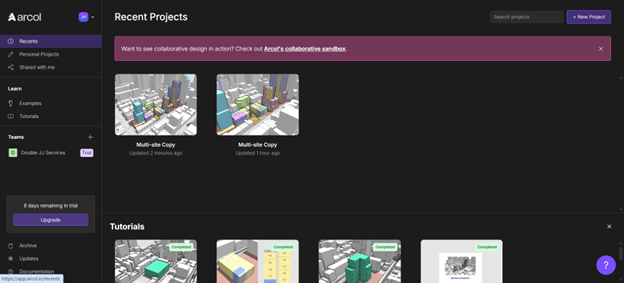
The Projects page layout is very similar to other platforms, making it easy for a first-time user to navigate. It allows you to access recent, personal and shared projects, as well as examples and tutorials. The Tutorials link includes four interactive introductory tutorials I plan to start with as I dive into my review, as well links to video tutorials on Arcol’s YouTube channel, that I will move onto next. The Examples link includes existing projects that you can explore to practice editing and creating sites and buildings. There is also a link to a collaborative sandbox that allows you to experience real-time collaborative design in action. The sandbox highlighted the collaborative nature of Arcol as multiple buildings and areas changed while updates were being made across the model.
User Interface
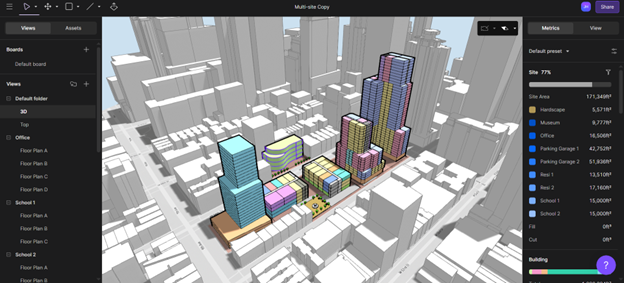
The Arcol user interface has four main areas: the main tool bar at the top; the drawing area, which Arcol refers to as the canvas; and the left and right sidebars on either side of the canvas. The main tool bar contains the main menu, various shape tools and the push/pull tool. The canvas area is the primary workspace where users can view, manipulate and create designs.
The left sidebar includes a tab for Views for users to create, choose and modify Boards, Model Views and Design Options. There is also a tab for Assets, which allows users to create blocks that can be reused as sketch elements. The right sidebar has a Metrics tab that users can use to set metrics presets and control metrics for the site, building, area types, parking, cost and carbon. It also includes a tab called View, where settings for camera view, shadows, styles and map layers can be controlled.
Interactive Introductory Tutorials
Basic Modeling Tutorial

This tutorial covered Arcol’s Navigation Controls for Orbit, Pan and Zoom using the mouse, which were the same as in many other CAD programs. It then moved right into how to clear a building from your site, how to use the Line tool to draw a new building shape on the cleared area of the site, and how to use the Push/Pull tool to turn your building footprint into an extrusion. The process was very similar to sketching and extruding in many other 3D CAD applications. Lines automatically locked to the correct angles and geometry, making sketching quick and easy.
The extrusion properties could be easily edited from the options in the right sidebar. When defining building types, the user can choose from Commercial, Industrial, Museum, Residential, Retail and School. From there, the floor count and ceiling height were automatically set. Editing those settings, as well as adding or removing floors, was as simple as updating the appropriate metrics.
Floor Plans Tutorial
Next up was the Floor Plans Tutorial, which shows the user how to open a floor plan view by simply clicking on a floor on the side of the building. From there, the user can modify the floor plan by deleting walls, creating walls, or dragging walls to new locations. Floor plan updates can also be assigned to other floors.
Pro Forma Tutorial
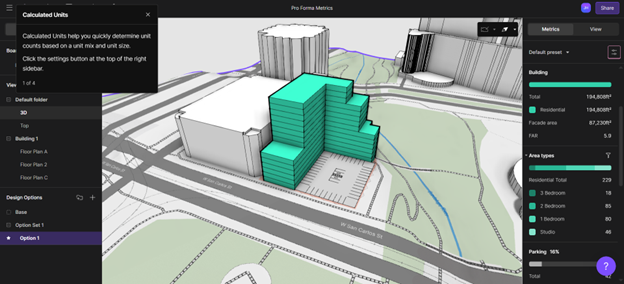
Third on the list of welcome tutorials was the Pro Forma Tutorial, which covers how Calculated Units can quickly help determine unit counts based on a unit mix and unit size. New projects always default to assigned units. The settings button on the right sidebar allows the user to change the area type from Assigned to Calculated and adjust the Mix, Size and Cost of the units. The Arcol metrics are designed to be set-and-forget. Once set, when design changes or new designs are introduced, all metrics are updated in real time.
Creating a Presentation Tutorial

The fourth and final welcome tutorial introduces Boards, which are an infinite canvas within Arcol that allows users to create Mood Boards and Sheet Sets. The Sheet button on the main toolbar lists default sheet sizes and lets you create custom sheet sizes. Once the sheet size is set, users can create custom views or use the default view to create a live-updating presentation.
YouTube Tutorials
After completing the introductory interactive tutorials, I was prompted to complete them. When I initially logged into Arcol, I decided to move on to the series of Video Tutorials listed on the Projects page. These link to Arcol’s YouTube channel and allow viewers to take a deeper dive into Arcol’s functionality.
Creating Your First Project in Arcol
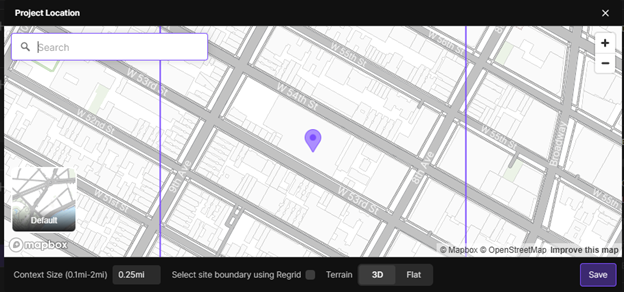
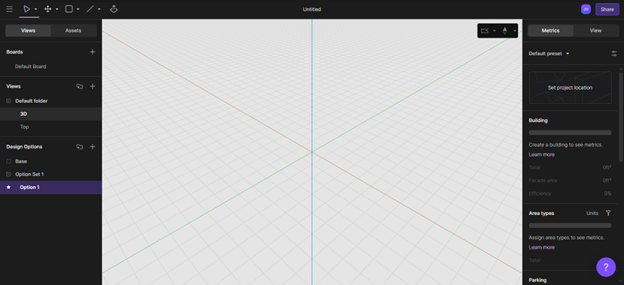
This tutorial begins by having the user launch a new project and then set the project location using the link from the metrics tab on the right sidebar, which opens a map window. You can then enter an address to find a location, or manually click the map to place a pin. Next, the user is prompted to clear a site and add the new site boundaries by using the Line tool. Arcol makes this very easy by automatically snapping to the appropriate angles and geometry. There are also options within the Line command to ignore snap, ortho lock and scene snap.
Once the site boundaries are set, the user adds the appropriate setbacks and the new building outline using the Line tool. Changes to the building outline can be made by either dragging the building lines or clicking the appropriate dimensions and entering a new value. The Push/Pull tool allows the user to extrude the building’s height to the desired elevation. Finally, the user sets the floor heights and assigns the appropriate Building Function.
Floor Plans and Area Types
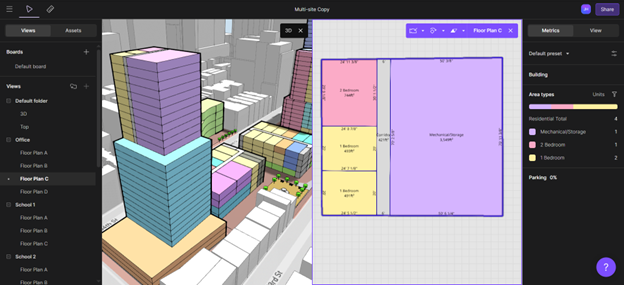
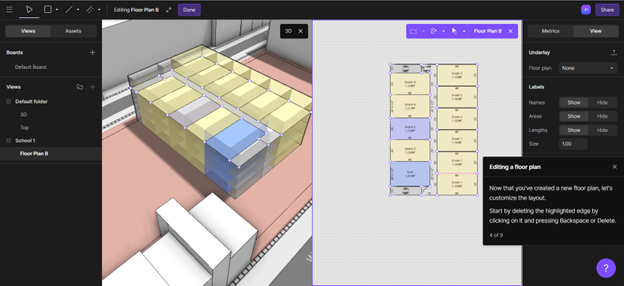
This tutorial continues by instructing the user to create and assign specific floor plans to the various floors of the building created in the previous tutorial. Once floor plans are created, floors with the same floor plan will act together when editing the floor with tools such as Push/Pull. Arcol allows users to expand different floors into a split view, showing both the floor plan and the 3D building view simultaneously. Edits to the floor plan are visible in real time in both the floor plan and 3D views. Different area types can be assigned to the floor plan, such as Residential, Commercial, Industrial, Retail and more. Moving into more detail, I was able to assign area types to different rooms. The floor plan will show the Area Type for each room, along with the room’s dimensions and square footage.
Parking
This tutorial explained how a site’s required number of parking stalls is calculated. Under Building settings in the Metrics sidebar are listed all assigned Building Functions. Under each Building Function, users can assign parking requirements to each Area Type. Choices include Fixed, Per Unit and By Area. When creating a parking area, users first create the area by sketching it using the Line tool and then assigning the Parking Function and Arcol automatically creates the parking stalls based on the parking requirement parameters that were set. The default parking type is surface parking, but it can be converted to a parking garage by extruding the sketch with the Push/Pull tool, selecting it, and adding the appropriate number of floors in the Metrics sidebar.
Views
The Views tutorial discusses the two default views, 3D and top, that are included in every Arcol project and how to create and edit new views. Every view has a set of defaults, such as shadow and camera positions, that can be changed. There is also a button to restore the view settings to their default if needed.
Boards and Sheet Sets

In the final tutorial on the Project Page, users learn about Boards and Sheet Sets. Boards can be found on the left sidebar under the Views section. Boards are 2D environments in Arcol that work the same way as most other whiteboard tools. Users can place shapes and text and insert images. Arcol boards are different, though. Uusers can place Sheets, Views on those Sheets and Metrics text on those sheets as well. There are several default sheet sizes to pick from when creating a sheet and custom sizes can be created as well.
To place a view on a sheet, all users must drag and drop a view from the list in the left sidebar. Views on the Sheet are live-linked to the model. If changes are made to the model, they automatically appear in the Sheet View on the Board. A dynamic Text tool allows live-linked text to be placed on the board. Live-linked text shows metrics from source views, such as total site area and total building area square footage. There are many more metrics to choose from, which will all update automatically if the model is revised.
Title blocks with a company logo can be easily placed on the sheet. Sheet Sets can also be shared with others by sending a link that will take the recipient to a PDF-like view, which is a live view that updates as there are changes to the model.
Arcol’s Collaborative Sandbox
The term “sandbox” has been used as a metaphor for a safe, isolated environment for experimentation. That reference describes Arcol’s building design software almost perfectly, except for the term “isolated.” Arcol’s collaborative, real-time environment is far from isolated. It enables real-time, web-based collaboration using a single model, which helps eliminate fragmented files and disconnected feedback. It could be said that Arcol’s collaborative sandbox is a safe, inclusive environment used for experimentation, helping design teams, contractors and owners create better designs quickly and easily.
While Arcol is not a platform for the building detailing function of creating all the required technical construction drawings and documents, it is a very powerful conceptual tool for creating and presenting building designs. For as powerful as it is, I was very surprised by how quickly and effectively I was able to learn the software by following the provided tutorials. Arcol is extremely intuitive and the simplicity of the user interface, along with the command tips, makes it easy to get started very quickly. For teams looking for collaborative building design software to minimize design time and maximize design presentation, I highly recommend Arcol.